Search This Blog

Friday, December 13, 2013

Funky Christmas Monkey

I just love the Christmas season!  It just seems like such a fun time of year to do special things with the family.  I love all the traditions and special time spent together.

This year has been a little difficult with our living room stripped to the studs and all our decorations in the storage unit.  We won't have a tree and there are no stockings hung so it's a little harder to get into the spirit of  things.  I almost had a melt down the other day when I called the drywaller and he said he couldn't come until after Christmas!  Oh well.  My kids have been such good sports about the whole situation and I haven't heard any complaining from them.

So, in an effort to get into the spirit Christmas, and an effort to teach my children to serve each other I have created the Funky Christmas Monkey!


"Why a monkey", you ask?  Well, it's a long story but what else do you have to do but read my long blog story?!  I went to the craft store to get supplies to make elves.  Of course, they didn't have anything I needed.  I wanted this project to be quick and easy.  So, as I was standing in the store trying to make my brain work I remembered my 13 year old son say a few weeks ago that he always wanted a sock monkey.  I know, weird!!  Don't know where that came from but it actually happened.

I have never made sock monkeys but always wanted to try.  I ran to the sock outlet store and grabbed some really cute knee socks.  I know, wrong socks but what did I know!?  Anyway, made another trip to the store to get the right kind of socks and the other supplies.

Here's the tutorial I used to make the sock monkeys.   This tutorial is fantastic.  It has very clear instructions with great photos!

Here's how my monkey's turned out.  The socks came in a pack of 3 for about $5 and the other supplies were inexpensive too.


Remember the knee socks I bought?  I used those to make hats and scarves for each monkey.


So each of my kids got a monkey and the idea is that each day the monkey does an act of service for someone in the family.  You leave your monkey where the service took place with a little note.  It's a nice way for the kids to think about someone else in the family.


We have only been doing it for a few days but it's been great.  There have been breakfasts made, laundry put away, and lots of bed making.  The Funky Christmas Monkeys have been hard at work.

So, I hope you each enjoy your Christmas season!  Think of me as you look at your beautiful trees.  I'll be dreaming of a drywaller this year and enjoying watching my kids make memories together.  (If only they were all nice memories, right?!)

Merry Christmas!!


Living Room Tear Out

We made the decision early on in the drafting process that one side of the house shouldn't be saved.  The east side of the home is not original and has multiple additions.  There is extensive termite damage and roof-line issues so that side of the house will be torn off next spring and rebuilt with a second story on top.

While waiting for the spring to come (and let me tell you it can't come soon enough!) we will spend the winter remodeling a couple rooms on the west side of the house.  First up is the living room.  Here are some before shots.  Please don't laugh, the last time it was remodeled was obviously in the 80's!


The above photo is of the beautiful bay window in the front of the house.  I have always loved that feature and it adds so much character to the house.  Excuse all the toys!  Can you tell we have kids??


Here's my hubby standing by the west wall.  You'll see a lot of him, never this clean though!


This is my father-in-law.  You won't see him this clean again either!  He volunteered to help gut the room.  I think we need to have him checked out.  Who in their right mind would volunteer to help with this project????  Anyway, we were so thankful for his help.  He worked hard and was so glad to go home when the time came!  He's standing by the wall that has the staircase behind it.

We began in early October by gutting the room down to the studs.  Not an easy task as the home had lathe and plaster walls.


You'll notice there were many shades of shall we say, interesting wallpaper!  We also found adobe used for insulation.  The hubby and father-in-law spent a couple days trying to decide what to do with the adobe.  Should they pull it all out?  Should they leave it?  If they leave it, how do you have room to put modern insulation in the walls?  In the end they decided to leave it and add extensions to the studs and put foamboard insulation on top of the adobe.  Nothing is ever easy in an old house!


Here's the stairway wall.  Do you notice all the dust in the air?  Ah, the dust!  We sealed off all the doorways with plastic and duct tape but I'm not even sure it made any difference.  Everything in the house had a lovely layer of dust!  It seemed like the more I vacuumed, the more dust there was.  It was AWFUL!!


We found little surprises along the way.  The house was built before there were any sort of building codes so we knew we would find some things.  We however, were shocked to find that the wall holding the stairs wasn't sitting on ANYTHING!  That's right, the wall of the stairway was just floating!!

We also exposed old knob and tube wiring,  We knew there was some in the house so that wasn't a surprise.  Here's some photos for those of you who have never seen it.  It's really not the safest wiring so I'll be glad to get it out.


Notice the paper wasp nest attached to the top wire!  Yep, we've been finding nests of things everywhere!!


Speaking of nests, this lovely nest was found in an interior wall.  How in the world did the hornets get into the interior wall?  See, my house is so wonderful, all creatures want to live here!!


The other shocker we found was that the bay window had no header so that wall was sagging.  Below is the hubby, father-in-law, and son trying to fix that issue.  Yep, we put the son to work!!  Quick, call child services!  Just kidding.


Ok, so we even put the little one to work!  Do you love how all my photos look like it's snowing inside?  I told you it was bad!


Anyway, the walls are down' the ceiling is gone' and the insulation is going in.  Progress!  I just have to keep telling myself that!


Here's the stairway opened up.  Yep, that's the hubby's backside.  Sorry about that.  No time for a photo break!  Work faster!!!


Ok, last one.  This is the west wall if you want to compare it to the before photo.


So the work is progressing and I can't wait to post after shots!  Keep checking back to see if I've lost my sanity.  

Maybe I should post a photo of the little sitting room that has become our living room.  Yep, I'll do it!


Here it is.  We were lucky the house had a sitting room right off from the living room.  We barely had enough room to get the couch in and still open the front door.  So, it's a little tight, and yes there is a giant hole in the corner, but hey, we're making progress!  Right?!


Thursday, December 12, 2013

Drafting!

Silly me!  I thought the drafting part of our home remodel would be the easy part...NOT!  It has taken weeks, yes weeks, to come up with a plan.  Todd and I have disagreed on more issues than I thought we would.  We had the plans almost done and then it was suggested that maybe we flip things around and put the kitchen on the other side of the house.  Are you kidding me?  I could almost see the light at the end of the tunnel!  Start over?????

Well, I caved!  Want to know why?  Because it got me a bigger kitchen!  Yep, isn't that what life is all about, big kitchens.  Well, not really but if I have to spend countless hours in the same room I sure want it to be spacious and functional!

Our good friend Scott Gibby was our draftsman.  He is an aerospace engineer who does drafting on the side.  He's one smart cookie!  And talented too!  I'm happy to say we are still friends after the whole switcharoo!  We sort of just gave him a list of wants and needs and he fit it all in.  Amazing!


Todd and I spent many hours looking at the plans, asking questions like, "what if we did that?" "well then we would have to change that".  "That doesn't work...what about that."  Sometimes I thought my eyes were going to bug out!  We found that most of the time a good nights sleep solved the problem.


In the end, I think we came up with a great plan and I'm so excited to see it actually come to be!

We gave the plans to two different general contractors for bids.  In the end we choose one that both Todd and I thought would do a good job and be nice to work with.  

So why hasn't construction started you ask?!  While we took a couple days to choose which contractor to go with the one we chose was signing contracts with another family to build their new home.  Yep, we just got bumped to next Spring!

So, another winter will be spent in the cold drafty house, the baby will outgrow the kitchen sink for baths, and I may loose my sanity but who needs sanity, right?!

Tune in next Spring for major renovations and in the mean time we'll be doing some remodeling projects on the side of the house that won't be torn down.


Friday, May 3, 2013

Corn and Avocado Salsa


Corn and Avacado Salsa is one of my 'go to' potluck dishes.  It's one of those recipes that's so easy and looks yummy so people eat it.  Actually the only bad part of taking it to pot lucks is there are NEVER any leftovers so I never get to bring any home.

I always get asked for the recipe so here it is!  ENJOY!


Corn and Avocado Salsa

1 can corn, drained
1 can black beans, rinsed
4 green onions, sliced
2 avocados, cut into small pieces
1/2 bunch cilantro, chopped
2 jalapeno peppers, seeded, deveined, chopped
salt to taste
1/2 bottle zesty Italian salad dressing

Combine all ingredients in a large bowl and refrigerate for 1 hour.  Serve with tortilla chips.  I love scoops because you can get a big yummy bite of the salsa.


Anyway, take this to your next potluck or butter yet, make it for your family.  There won't be any leftovers!!

Linked up with:

Lil\'Luna

Tuesday, April 30, 2013

Milk Can Makeover

My mother-in-law recently celebrated her 65th birthday.  No, I'm not in trouble for telling you all.  She is proud of making it to retirement as she should be!

One thing I have in common with her is the fact that we both love shabby chic.  We love to take old things and give them new life.  So, for her birthday I decided to take an old milk can that was sitting around our house and give it a makeover. I think it turned out so cute and she loved it.

What do you think?


Here's what it originally looked like.  Not too pretty!


It's had a rough life.  As you can see it's pretty dented and the top had a little rust on it.  I saw the potential though.

I started by giving it a good sanding, especially the top to remove the rust.  I then painted the top and bottom with black spray paint.


I then taped off the top and bottom and sprayed the middle a pretty teal color.


When that was done I used an antiquing glaze over the teal.  I just painted it on with a sponge brush and then wiped over it with a paper towel.  Just play with it until you get the look you want.

Before Antiquing Glaze


After Antiquing Glaze

I used my Cricut to cut the rooster out of white vinyl and attached it to the milk can.  I also added the ribbon to give it a little texture.


Super Cute!  I love that something old can be made so cute with just a little work.  Happy Birthday Mom!  Hope you had a memorable one!


Linked up with:
Lil\'Luna       

Friday, April 19, 2013

Family Camp in Review


 Last summer our family attended Aspen Grove Family Camp in Provo Canyon located in Utah.  We had so much fun that I thought I would share our experience with you.

What is family camp?  It's summer camp for the entire family.  There are several throughout the country so if you can't make it to Utah check out which ones are in your area.

Honestly this was one of my very favorite vacations EVER!  Why?  Because I, yes me the mom, actually got a vacation!  That's right, I got to relax...on vacation!  You moms know what I'm talking about.  Vacations always seem like so much fun until you have to do all the packing, the prep work, plan all the activities to keep the kids happy, more packing...you get the idea!  Sometimes it's not much of a vacation.

At family camp, everything is already planned for you.  At Aspen Grove, the children are divided into age groups with young adults as group leaders.  They even had daycare for the baby!  Each day after breakfast the kids head off with their group to participate in tons of fun kids activities.  They go swimming, hiking, do arts and crafts, you know all that fun summer camp type of stuff.  You meet up with them for lunch and then they head off again.  In the late afternoon there were family activities such as ropes course, water games, and such to do as a family and then after dinner there were camp fire activities or shows.

As you can see my kids LOVED their group leaders!!


For the adults there were all sorts of workshops and activities.  There were spiritual seminars, as this camp is run by the BYU Alumni Association, as well as parenting and marriage workshops.  There were also activities such as pottery, crafts, pen turning, ropes course, and a shooting range.

Here's Todd enjoying his pen turning class.  He looks pretty cute in those safety goggles!


The lodging was really nice.  Aspen Grove has a few choices as far as lodging goes.  They have rustic cabins with a bath house.  I didn't actually go and check those out but judging by the rest of the camp I bet they were nice and clean.  We stayed in the Beckham Lodge.  It was like a little apartment but with no kitchen.  The lodge did have a shared kitchen on each floor so we had access to a refrigerator and oven.  So take lots of snacks and drinks!  ( I didn't and was sorry when we got there!!)  Our 'room' had a master bedroom that led out to a shared porch with an incredible view of the mountains, a room with bunk beds for the kids, a living room with pull out couch and a bathroom.  The best part....NO TV!  That's right, no TV at summer camp!!  There was also a laundry room on each floor of the lodge.

The other lodging option is a family lodge.  You have to have a group of at least 26 to book a family lodge.

Here are the kids on their bunk bed.  The middle one is showing the ceramic skull she made at arts and crafts.


At night after all the kids were put to bed the parents would hang out in the lounge playing games and chatting.  (Bring you baby monitors! It comes in really handy!)  The kids were so tired from all their fun activities they went right to sleep.  And when I say right to sleep I mean right to sleep!  They were so exhausted they were asleep before their heads hit the pillow!  Another bonus to camp!

This is our little group staying up late playing some games.


Now, lets talk about food!  I DIDN'T HAVE TO COOK ANYTHING FOR A WEEK!!  Ahhh, I love this part about camp!  We had 3 meals a day and I didn't have to cook or clean ANY of it!  The food at Aspen Grove is cafeteria style but it was delicious!  They had a good variety of foods that were well prepared.  And for an added bonus...they had a kids bar!  It was full of baby food and all that food kids love to eat.  They had chicken nuggets, mac n cheese, PB&J, you get the idea.  So if the kids didn't like what they were serving on the adult bar they could just go over to the kids bar and find something there.  We ate well!  I would recommend taking lots of snacks and something for the kids to munch at night.  There were no food options after the dinner meal and my kids are used to having some sort of bedtime snack.  Let's face it, so am I!

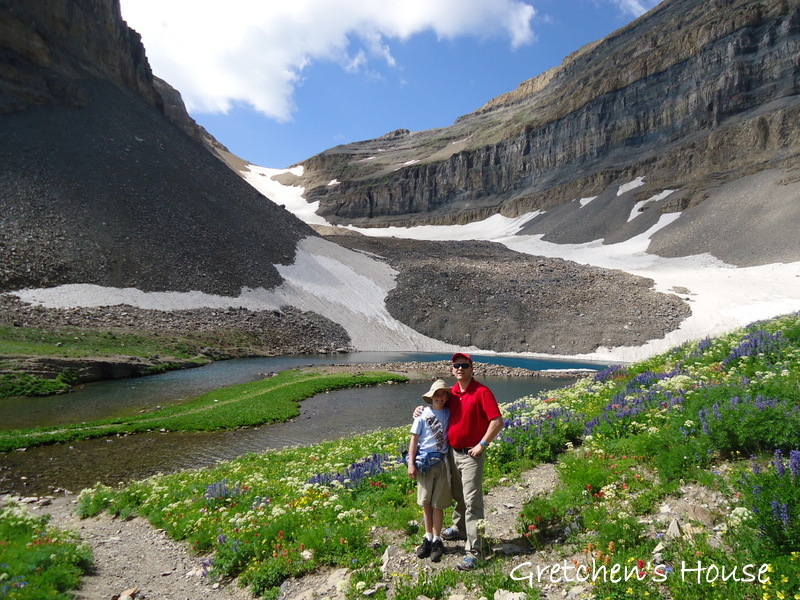
Wednesday at Aspen Grove is hiking day!  The true hikers go and hike Mt. Timpanogas.  It's a grueling 14 miles round trip.  The camp packs you a lunch and most are back in time for dinner.  If not, they have 'to go' boxes for dinner.  All of the kids groups go on a hike that day.  The kids loved it and felt a sense of accomplishment when they got back.


Todd and our oldest son were brave enough to hike Mt. Timpanogas!  I think they had a pretty good time but they were pretty exhausted by the time they got back!


The Summit!

Did I forget anything?

The entire camp staff, from the director all the way down to the cleaning lady who came to clean up after our daughter got sick in her bed, were terrific!  They were all wonderful and all seemed happy to be there doing what they were doing!

We hope to go back sometime soon.  The kids still ask about it and of course, so do I.  Who can resist a vacation where I don't have to cook, clean, or plan any activities?!?  Aspen Grove....here we come!


Tuesday, April 16, 2013

Orange Creamsicle Cupcakes

I don't know about you but we are REALLY looking forward to summer coming to Utah! One of my favorite memories of summer is Orange Creamsicles. I mean, what's better than a popsicle with ice cream in the middle?! My mom would buy them each summer and boy were we happy campers. 

 Well, it's not quite warm enough for popsicles here but I came up with a really yummy and simple way to make Orange Creamsicle Cupcakes. They taste as yummy as they look!
 

Here's what you need:

White cake mix
3 eggs
1 C. water
1/3 C. oil
1 1/2 tsp. orange extract
zest from 1 orange

Mix all ingredients together and bake cupcakes.  Let cool completely.

For the frosting:

8 oz cream cheese
1 stick butter
1 tsp. vanilla
3 C. powdered sugar
8 oz. whipped cream

Cream the cream cheese and butter together.  Add vanilla and powdered sugar.  Gently fold in the whipped cream.

Now the fun part.  Cut off the top of each cupcake


 Use a cupcake corer and core each cupcake


Place your frosting in a piping bag, fill the center hole in the cupcake


Pipe more frosting over the rest of the cupcake


Place the top back on the cupcake


There you have it!  Delicious Orange Creamsicle Cupcakes.  The frosting is addictive so be careful!


These cupcakes are kid approved! 


Lil\'Luna