Search This Blog

Friday, August 15, 2014

A Room With a View and Other Stuff

There were a couple weeks where there were so many people coming and going I just opened the door and let everyone in.  At one point I had plumbers, electricians, heating and air, and my contractor all in my house at once.  My front yard looked like a redneck parking lot!!

It was great to see the windows and doors go in and know that the critters were no longer allowed to roam in my new house.

I especially like this bump out in the dining room.  It mimics the bay window in the front of the house and the extra room around the table in nice.  It will eventually get a little deck off from it.


Here's a back view of the house with the new windows.  You may also notice my washing machine at the back of the house.  I was really glad to have it hooked up but it's not really the ideal laundry room!


 While the windows were going in so was the electrical, plumbing, and insulation.  We upgraded the insulation and got spray foam on the roof and blow in for the walls.  It was amazing the difference that made in the upstairs of the house right away.  I think we will be having warm winters and cool summers now.

Here's a good view of the spray on insulation in the ceiling.


And another good view.  You can see how it just fills in every little nook and cranny.


Here's a view of the walls in an upstairs bedroom.


So I think we are ready for sheet rock!!  Boy, that's going to change the look of things!

Connecting the Old and New

I realized I am so far behind on blog posts!!  The actual house is almost done but from my blog you wouldn't know it.  The house has been sucking up so much of our time that I haven't even had time to post anything.  I'll try and catch up!

The moment finally arrived to connect the old side of the house to the new.  I was really excited to see that happen.  I had only been in the upstairs of the new side once and I had to climb a ladder to do it.  I'm not a big fan of climbing ladders!

There was a small hole cut first so I could peak through, adding to the anticipation!  Can you peak through and see the new side?


A couple days later the "extra" parts of the house were removed and the two sides were joined together.

This view was taken standing on the stairs looking upward into the new part of the house.  The old house ended at the top of the stairs.  There was a wall at the top of the stairs and they curved left sending you to the two old bedrooms.


Here's another view standing at the top of the stairs looking into the new part.  The kid's bathroom is straight ahead with two bedrooms to the right.  There ended up being enough space outside the bathroom and bedrooms to put a little family room up there for the kids.  Bonus!! 


This is the view from the kid's bathroom looking into the old part of the house.  The new bedrooms are to the left and you get a view of the family room.


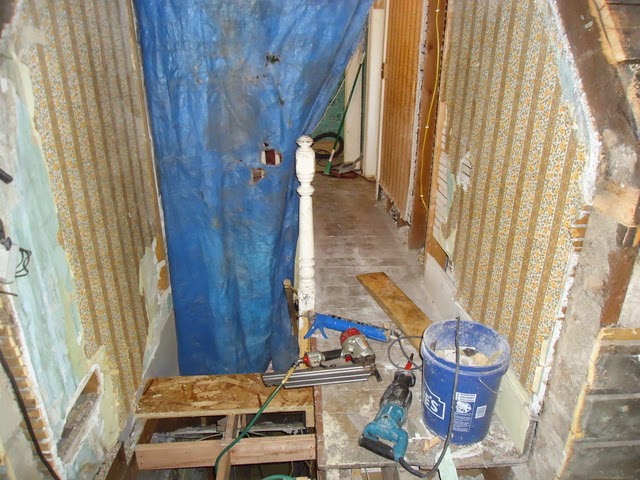
I'm just adding this last photo so you can get a sense of the mess we have been living in for the past few months!!  Yuck!!  This is right at the connection of the old and new house.  Notice the gaping hole in the floor!  Hope you don't sleep walk because at my house it could be deadly!!


The New Dormer

Work is progressing and the house is starting to take shape.  One area that really needed attention was a small area upstairs by the two old bedrooms.  The original house only had two bedrooms upstairs...that's it!  Neither one had a closet so a TINY little closet was put in between the two bedrooms.  You can see it pictured below.  The roof slanted in it and you could hardly get a coat hanger in it but it was a closet and at least a little storage space.


That little space upstairs was really dark so we thought a dormer window would be perfect to let in light and open that space a bit.  The original engineer who drew up our plans put the dormer in the plans but was skeptical weather it was actually possible to put on there.  These old homes were built long before any building codes.  The bedroom doors weren't even framed with headers!  Our contractor looked at it and had his doubts.  We decided to reinforce a couple things and go for it.

Here's another view of the before.  Even in the day we had to keep the light on to see up there.


Here they are tearing out the closet and roof.


You can see the contractor put headers over the doors and framed them correctly and then put a large beam between the two doors.

We had a gaping hole in the house for a few days and of course it decided to rain!!  Never fails!!


When it was all said and done it made ALL the difference!  I love the dormer and it lets so much light in!  It made a nice little area up there too.  I may put a desk or chair and book shelf or something there.


And look, no more funky wallpaper!

Tuesday, July 29, 2014

Rain Rain Go Away!!


We had a very early spring this year and we were so happy about that.  We were itchin' to get started on the house.  We knew we were taking a chance starting the first of April but we moved forward anyway.  We had really great weather through all the month of April.  We had just a few very light snow showers the first week of April but then everything was just beautiful.

Well, that all ended the week of May 5th.  It rained for four days and I thought it was never going to stop.  After two days I started to smell a very nasty smell up stairs in the kids bedroom.  I actually made them clean everything out from under their beds because I thought a mouse or something had died in there!!

We finally realized the smell was coming from the adobe in the walls.  The adobe was completely soaked with rain water and the inside plaster was starting to soak in the water too.

The kitchen was the other issue.  The drip edge on the roof had been cut off so the water just ran straight down the wall and into the old kitchen.  We tried to catch some if it with buckets and bowls but most of it just ran down the wall and into the carpet.  It was a little stressful and very smelly so we were glad when the rain finally stopped.

The yard was a mud pit!  The equipment tore the yard up pretty good but I guess all of that can be put back together later.


Tuesday, May 13, 2014

I've Been Framed!

I've been framed...but in the best possible sense of the word!!  It was beyond exciting to see the first wall go up!  Isn't it beautiful?


Ok, maybe it's not that beautiful but I've waited over a year to see that first wall go up!  And then another went up and another went up!


It took about a week to frame the main floor and another week to frame the upstairs.


Here's Todd and I standing in what will be the kitchen.  To our left will be a half bath, pantry, and master bath.  Behind us is the laundry room.  You can see little Tate running around in the back.  


This is another view of the main floor looking towards the front of the house.  The girls are running around in the kitchen.  The door on the left is the pantry door.


We used our children as slave labor to clean up the job site.  They were good sports about it!


Check out Todd on the floor of the upstairs without any walls.  I was too chicken to go up so I just took pictures!!  You can see where his hand is the eve has been cut off the roof.  This was done in order to connect the old home to the new addition.  Not important to note until the rain decided to come!


I thought the house looked pretty funky when the upstairs walls went up.  There will be a dormer window in the front so that looks a little weird right now.


I'm thinking it's looking like a house!


Foundation: Mid-April

The big day finally come to dig the foundation!!  It was fun to see the foundation of the house going in.  It took just a day to dig the hole.


We discovered just how rocky our soil is.  I'm not sure we'll ever get a garden to grow here.

During the week of digging the foundation and setting the forms for the footings and the walls there were so many vehicles here.  At one point I could hardly see the house from the road!

Can anyone see my house??


A couple days after the hole was dug the footings went in.


Then after that the forms went in and the walls were poured.


The forms came off and then it got back filled.  Then the floor joist went on.  You may notice in the above photo that there was originally a window poured in the far wall.  We had to change the design and eliminate that window because we needed to add a staircase to access this basement. In the original plan this basement would be accessed through the basement under the other side of the house.  Our contractor didn't feel good about cutting a doorway in the old rock foundation.  So, we added a stairway in the laundry/craft room to access the basement.  I wasn't happy about giving up so much space in my room but in the end it will work better and be nice that we won't have to pass through the old basement to get to the new one.  


We are now up to ground level and things are moving right along!

Friday, April 25, 2014

Stacking Stools: How to Paint Vinyl

The other day the whole family was sitting in the new living room enjoying one of our favorite TV shows.  I sat there thinking, "man, I need a foot stool."  I knew there wasn't room for an ottoman like I had planned so I thought for a couple of days about what would work in there.

It hit me that I needed a couple small stools and it would be wonderful if they would stack so I could sit them between the angle of the sofa and chair.  Dream on!  I sort of put the idea out of my mind because I didn't know where in the world to even find stacking stools and if I ever did I was sure they would be way out of my price range.

Well, I went to one of my favorite local antique stores to find a birthday present for my mother-in-law.  You will not believe what I found...STACKING STOOLS!!  I'm not kidding!  They were perfect other than the ugly colors!


I mean super cute other than the fact that they don't match anything in the living room!  I negotiated a good deal on them and thought I'd just have to figure out a way to make them cute.

Did you know there is paint for vinyl?!  Well, there is and it's wonderful!!  It's Rust-oleum Painter's Touch and it works like a charm!  I thought maybe the vinyl would feel weird after it was painted but it doesn't.  It's flexible and soft and you would never know it was spray painted!


Look how cute my stools are now!!


Who would have known those ugly stools could turn out so cute!  I just love them!

Here's how I did it.  The first thing I did was sand the wood.  I just took a medium grit sanding block and did a once over.


I then cleaned them with a degreasing cleanser like a 409.
 I painted the wood with a regular interior latex paint with a regular paint brush.
Then came the task of taping it off.  I used a painters tape.  This was the most time consuming part because of all the curves.  Why doesn't someone invent a flexible painters tape? 


Then outside I went to spray paint.  I used one can of the spray paint and put on about four thin coats.  The paint has a primer in it so I didn't have to prime first so that was nice.


After all the layers of paint were done I brought them inside and let them dry overnight.  I think they are just great and I couldn't have found anything more fitting for the space.


They look great next to my chair.  And you can sort of see in the close up photo that the vinyl is still soft and doesn't look painted.


So the next time you are out hunting for treasures and you come across a vinyl chair that has great lines but the color makes you cringe...grab it and a can of spray paint and have some fun!!


Monday, April 14, 2014

"Oh no! It's gone!"

We headed to Bear Lake for Spring Break the first week of April.  We were excited to get out of the mess of construction and have real bathrooms to use!!  We knew that half of the house would be knocked down while we were gone.

Here's what the house looked like before.  The little front porch had already been pulled off.


Here's another view


I of course wanted to see the tear down.  I mean, how often do you get to see your house knocked down?!  So we came back to see it happen.  I thought the kids would get a kick out of watching but after about 10 minutes they were ready to go.  What's up with that??

When we got to the house they were already about half way back.  They worked so fast and it was amazing to see how gently they used that huge equipment to pull it down.


For safety reasons were weren't allowed on the property while they were working.  We sat in our van across the street and watched.  We would go run errands for a while and then go back to the house to see what they had done.  When we came back the last time, they were just about done and our little 2 year old said, "Oh no!  It's gone!"  He even had a little tear in his eye.  I was thinking the same thing!


Here's what it looked like when they were just about finished.


We realized how tiny the original part of the house really is.  I got a little emotional thinking about the generations of Edwards who raised their children in that house.  I wondered if Grandpa Lee and Grandma Bonnie, and Alice were watching it all happen.  Oh, it must have been a sight for them if they were!