Search This Blog

Thursday, March 27, 2014

Old Window Photo Frame

I love to give old things new life!  I definitely like things that look a little rustic and well used.

A few years ago I used an old window as a photo frame and I loved the way it looked.  I wanted to do the same with our new family photos so I've been searching the local antique shops and classified ads for old windows.  I wasn't having much luck!

One day while digging through a pile of windows at the antique shop a lady come up behind me.  I thought, "here we go".  People always seem to be more interested in something when someone else is interested in it.  I didn't say anything at first and the woman finally asked if I was looking for old windows.  Um, yah.  (I really should be more friendly sometimes!)  Well, she went on to explain that she had 'a couple' old windows at her house that she was willing to sell.  She gave me her name and number and said if I ever wanted to come look at them I was welcome to.

After finding nothing at the antique stores I figured the only thing I had to loose was a little gas money.  So I called the woman and went to check out her 'couple of windows'.  Well, I know why I wasn't finding any windows at the shops.  This woman had a huge cache of windows!  She had so many I had a hard time deciding which ones I wanted.  I ended up getting 3 windows from her and will probably go back for more.

That will teach me to be so unfriendly to people who try to talk to me at antique stores!!

Anyway, here is the result:


The large family photo is in a window that came out of this very room.  I was so happy it worked to use it.  I ordered a very large print of the family photo and then cropped the top off so it would just fit in the bottom pane.  I also added the quote with vinyl.


The window below came from the woman at the antique shop.  It's sort of perfect that we have four kids to put in the four panes.


Windows are pretty easy to use as frames.  I always have a tape measure in my purse so I can measure things when I'm out shopping.  I look for windows that have panes that are about the size of standard photos just to make my life easier.  So I look for panes that are 8X10, 11X14, 16X20, etc.  These panes were about 11 1/2 by 13 1/2.  You'll almost never find exactly the right size so just get close.  I trimmed the pictures down and used a little scotch tape to hold them in place.  I put white foam board behind each photo and duct taped that in place.  If you look close you can see that the pictures were a little small going one way but the white foam board behind sort of hides that.  You have to be really looking to notice.  

The other way to do it is to matte the photos.  Any frame shop can cut mattes to fit in the panes.  They can even frame the photos for you.  I wanted to go inexpensive on this project so I just did it myself.

I think the windows look great in the living room and what a fun way to fill up that big wall.

Don't mind the boarded up doorway.  That will eventually lead to the new kitchen.


Wednesday, March 26, 2014

Living Room Finished!

The living room is finally done! We still need to hang the clock and dig a few more decor items out of storage but other than that it's done! I can't be more excited to have one room in the house complete.  I can actually let people in now!!

Just to refresh your memory, here is the before:


And here it is...drum roll please... (and just a side note, I'm obviously not a photographer, so please excuse the awful photos.  The lighting is terrible!  Sorry!)


Isn't that so much better?  It was a little challenging to decide where to place the furniture but I think we did ok.  There wasn't enough room for a couch and love seat so we opted for a couch and two chairs, which I actually like better.


 In order to get enough seating in the room I decided to float the furniture in front of the bay window.  This room will act as the living/family room for us so we needed to get a lot of things in there.  The entertainment center that houses video games, DVDs, CDs, and a host of other things was a must.  I can get so much storage out of that unit I was not about to give it up.

Those familiar with this room will notice the new doorway.  The boarded up door will lead to the new kitchen and the black door on the left leads to the basement.  You will also notice we opened up the original doorway to the mud room (better know as the 'tool' room).


 Also a must was the piano.  Originally we wanted a separate music room but we weren't able to fit that into the house plans so the piano ended up in the living room.  I think we found an ok spot for it.


You'll notice my new old chair found it's home by the sewing machine in the bay window.


One of my favorite things in this room is this cabinet.  I found it in a friend's garage.  She was having a yard sale and I spotted this cabinet and asked her about it.  She was willing to part with it so home it came with me.  I think I paid $10 for it.  It was off white and needed some work but I love old rustic things.  I took the handles off, fixed a few things, painted it black, and put the handles back on.  It looks cute sitting in the corner and who can't use more storage!


Another piece of furniture that I gussied up was this end table.  I've had it since I was a kid.  It was dark brown and I wasn't sure I wanted to use it in the new living room but I needed a little table and it just fit perfectly.  I decided to give it a coat of accent paint and I now love it.


I scuffed it up on the edges, ya know, because I can't leave anything alone.  So cute!


Anyway, a great big huge thank you to my hubby and father-in-law who worked really hard to get this project done!!  Oh, and my oldest son too!  Now, all my friends and family come on over and see me!!

Friday, March 21, 2014

My New Old Chair


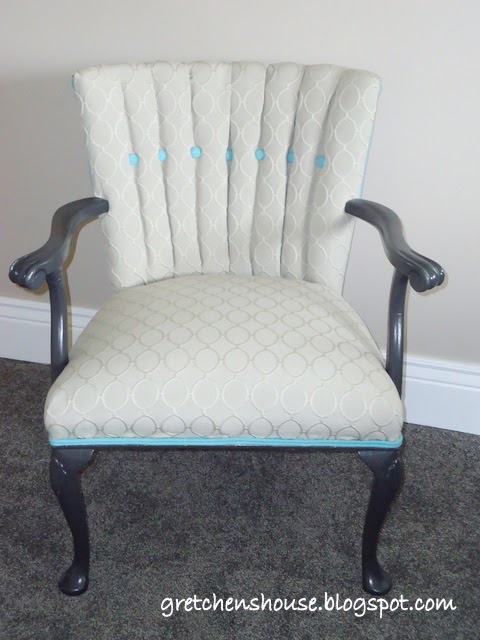
So here is my latest project...a new old chair.  I found this old nasty chair a couple years ago at a thrift store in Omaha.  I loved the shape and style of it but it obviously needed re-upholstered.  It was only $10 so I figured some day I would scrape up the money and have it re-done.  I could tell by the way it was made that it was worth doing so I convinced my skeptical husband that we should buy it.  You should have seen the look on his face!  He must LOVE me because he went along with it and bought the chair.


It sat around our house in Nebraska for a while moving from spot to spot and never really finding a home or new fabric.  When we moved back to Utah it found it's home in our big bay window next to my antique treadle sewing machine.  It continued to deteriorate while the kids climbed on it and the dog adopted it as his chair to sit and bark at people out the window.


After finally remodeling the living room I decided my chair had to be done.  Now by this time, I had enough time to convince myself that I could do the re-upholstering myself.  Crazy, I know!!  I often found myself thinking about how it was put together and thinking that if I got in the middle of the project and was in over my head, which was highly likely, I could always give up and haul the pieces to a real professional and have them put it back together.  Good plan, I thought.

So, I headed to the fabric store for supplies.  I had done some simple re-upholstering projects in the past so I sort of knew a few things.  I knew I wanted gray fabric with the teal accent to match the rest of the room.  I found some beautiful gray fabric with this really cute circle pattern to give it some texture.  Just perfect!  All of the supplies cost about $125 so now I know why the professionals charge so much!

Little bit had to try it out while he was eating his fruit snacks!

I started by taking the old fabric off and taking tons of pictures.  I saved all the fabric pieces and labeled them so I could use them as the pattern for the new fabric.  I was shocked to find that this chair had been re-upholstered before.  Another testament to the fact that the chair was well made, stylish, and worth saving!  There were still pieces of the original fabric on the front fanned part of the chair that had also been dyed green.


I went to work using the old pieces of fabric as patterns for the new fabric.  I tightened the strapping on the bottom of the chair to hold the old springs in place.  I enlisted my hubby to help because that was a two man job.  I also painted the arms and legs black to match the new living room decor.


I made piping out of the teal fabric and covered the buttons in teal too.  That's the accent color I used in the new living room.  I've made tons of piping over the years to use on bridal gowns and historic costumes so that was a piece of cake.  If you have never made piping you could just purchase pre-made piping.

I was able to get it all put back together and I LOVE IT!!  It just looks so adorable in the front window.  It wasn't as hard as I thought it was going to be.  I'm glad I took lots of pictures to reference as I put it back together.  I always think I will remember how the corners were done, or how it fits back together but I don't.


Anyway, my advice is don't be afraid to try new things!  Jump right in and if you get stuck there is always someone to help out.  In the end, if things had gone horribly wrong with my chair I wasn't out much!