Search This Blog

Saturday, February 23, 2013

Adventures in Moving


Moving is always an adventure with pitfalls along the way.  This move was no different.  My husband found himself in the doghouse for a while.  I had spent about a month packing boxes like a crazy woman.  It's amazing how much stuff we accumulated over the four years we were in Nebraska!  Todd called me from work one day to inform me that he had not read the transfer paperwork thoroughly and his company had hired movers for us!  WHAT?!? Not only had I wasted all that time packing but now I wasn't sure we were going to be able to leave Nebraska on time.  We were trying to make it to Utah for Christmas.

Todd must be a sweet talker because the moving company expedited our move and we only left a day later than planned and he got out of the doghouse with me.  I think I was just so happy I didn't have to pack any more boxes!

We decided to pull a trailer behind our van so we could bring a few things with us.  Because we were moving over the Christmas holiday, it would take the moving truck a few extra days to deliver our things.  One of the most important things we brought in the trailer was the Christmas Tree!  I thought it wasn't a big deal to not have a tree but when the kids overheard me talking about it one day they were shocked.  So the tree come with us, as did a couple beds, and of course the Christmas presents.

So, we loaded our four kids and the dog in the van and headed west.  We left about 6:00 pm on Saturday, Dec. 22, 2012.  The journey would take two days, or so we thought!  We drove for a few hours that night and then stopped for the night.  It had been a very long day of packing our trailer and van and supervising the movers packing the big truck.  

The next morning, Sun. Dec 23 we headed out for what we thought was the last leg of our trip.  It was a beautiful sunny day and we made a few comments about how lucky were were to have had such great weather to travel in.  I mean, when you move in December, who knows what kind of weather you are going to get!

We decided to stop at Chimney Rock in western Nebraska.  I had always wanted to see it as it was a major landmark the pioneers used on their journey west.  Sort of fitting, don't you think?  It was a nice little stop to let the kids play for a few minutes.


Notice the beautiful blue sky and the kids don't even have coats on!  It was a little windy but we had grown used to that.  Nebraska is ALWAYS windy!

We continued on, getting more and more excited about our destination.  While in Wyoming at a gas station I just had to snap a photo of  this truck!  Hmmmm, wonder what they are having for Christmas dinner?!?


I mean really, only in Wyoming!!

We finally crossed into Utah feeling a sense of home.  We just couldn't wait to get there.  It was getting dark as we came down into the Bear Lake Valley.  It had also started to snow.  I just thought it was that mountain pass and once we were down in the valley it would be fine.  Silly me!  It began to snow harder and harder and as we started up Logan Canyon things got really bad.  We were only an hour from home but our poor little van could not pull that trailer up the mountain!  The roads were just covered in snow and ice and things were deteriorating quickly.  So there we were, stuck on the side of the mountain!  Poor Todd, got out and put the chains on the van but we still didn't move.  We were literally STUCK on the mountain.  We were not going anywhere and I was really worried!  I didn't know what we were going to do.  Todd finally used gravity to get the van going in the right direction and got us back down the mountain.  Yay for my smart engineer husband!!

And as it just so happens, Todd's dad has a cabin at Bear Lake!  How lucky are we???  So, we headed for the cabin to hunker down for the night.  It was FREEEEEEZZZZZZZING in the cabin but we built a fire and snuggled and eventually got warm.  We scrounged around for some food and found some really yummy chili in the freezer.  Thanks for the good food!!  Ahh, adventures!!


Bear Lake storms do make for beautiful mornings!  We got up the next morning, which happened to be Christmas Eve, to this beautiful sky.  We went back and picked up the trailer where we had left it and headed over the mountain.


We made it home about 11:00 am on Christmas Eve.  Just enough time to set up the Christmas tree, run to the grocery store, and prepare for our annual sloppy joes by candle light!  But I guess that will be a post for another day!


Monday, February 18, 2013

Tie Scarf

Tie Scarf

It has been extra cold here this winter and so I was thinking the other day that I needed a new scarf to wear. I wanted something a little different and I came up with this idea.  Why not take some old neck ties and sew them together to make a scarf.  I think it turned out pretty cute.  What do ya think?


It was really easy to do and cost under $10.  I went to a local thrift store and looked for ties that were color coordinated.  You will need about 4 ties per scarf.


All you need to do is mark the center of each tie with a pin.


Then, lay the ties so that you have a fat end and a skinny end lined up together, matching the center pins.  Now, sew them together.  I just used a zig zag stitch but if you have fancy stitches on your machine that would look really good.


When you are done stitching just iron with a cool iron and you're done!  Super easy and I think very cute!  So, go dig through your hubby's closet and grab some old ties and get started!  Keep warm!!!


Wednesday, February 13, 2013

Valentine

Valentine!


It's not too late to make valentines!  Every year I try to make a little valentine for each of my kids to let them know how much I love them.  I never spend much but it's amazing how much they love them.

I've been playing around with my photo editing program so I decided to use some of the crazy settings it has.  I think the kids will think it's funny.  Especially the one I turned all pink and orange.  I just chose a picture of me with each of my kids.  I have to say, it took me a long time to find photos of just me and each kid.  I guess I need to take more of those!  After I found the pictures I just started playing around with each photo.  Here's how they turned out:


They each say, "I'm a 'Sucker' for you!"  with a little personal message too.  I just printed them out on white card stock and then mounted them on colored card stock. Super Easy!!


I'm sure the kids are going to love them!  Happy Valentines Day!!

Friday, February 8, 2013

Onesie Bottom Shirts

Onesie Bottom Shirts


I really love it when my little brain comes up with a brilliant idea!  It doesn't happen often so I treasure those moments.

When my oldest son was just a little peanut I got so frustrated when his little button down shirts would come un-tucked ALL DAY LONG!  The shirts were so stinkin' cute but I spent all day tucking and re-tucking.  Now that I have another little peanut the same thing is happening...tucking and re-tucking.

Well my friends, I have come up with a solution.  I know, crazy!  I have added my own onesie bottoms to his shirts.  It's pretty simple to do, and if you aren't the best sewer it's hidden in their pants anyway!


Here's what you need to get started:

  • Button down shirt
  • Onesie
  • Rotary cutter/scissors
  • Serger/sewing machine
  • Pins
That's it!  I usually get my onesies second hand.  I can always find some that look like new so why not?!


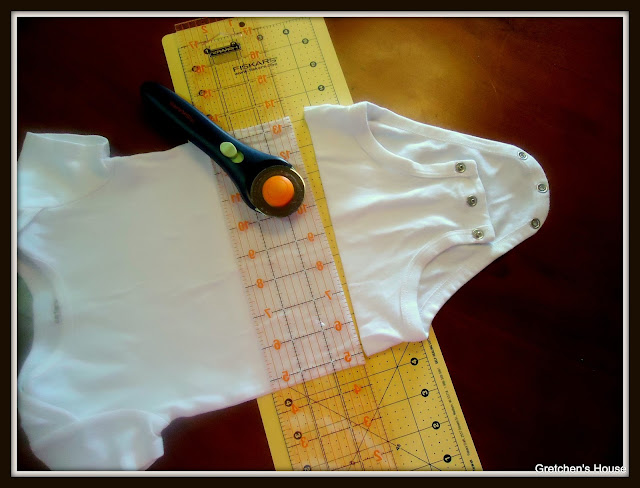
The first thing you need to do is cut the bottom off the onesie.  A rotary cutter is the quickest and easiest way to do that but scissors work too.  I leave about 1 1/2 inches of the side seam on the onesie.  That will allow you enough room for a seam allowance.


Next, mark the center front and back of your onesie and your button down shirt with pins.


Turn your onesie inside out then place it over your button down shirt lining up center fronts, backs, and side seams.  You should have right sides of your shirts together.


If you are a beginning sewer you will want to pin all the way around your shirts.  Notice, you will have to stretch the onesie as you sew because the onesie will be smaller than your button down.  Now, head for your serger, it's time to serge.  (If you don't have a serger just use the zig zag stitch on your sewing machine.  It works great as well)


Start at the center back and serge all the way around.  Notice I cut off the hem of the button down.  You will want to do this because when you get to the center front it will be too thick to get through your machine.  Trust me, I leaned the hard way!!!

And there you have it!!  A little button down shirt that actually stays tucked in ALL DAY LONG!  Your little one will be so happy!!


Friday, February 1, 2013

Valentine Shirts

Valentine Shirts

Happy February everyone!  We made it through January and this year, with the bitter cold, it's quite the accomplishment if you ask me!

As I was walking through Walmart the other day I saw this adorable pink and red trim and it was calling my name.  As I picked it up to look at, I thought, "wouldn't this be cute for a Valentine's shirt?"  My girls love to have special clothes to wear for holidays.  So I bought the trim and grabbed some inexpensive shirts and headed home.

I think they turned out pretty cute and they were super easy to make!  The whole project only took me thirty minutes, really!! 


Here's what you need to make your own:

  • T-shirt
  • trim
  • sewing machine
  • washable marker


The first thing you need to do is make a heart pattern.  I just free handed a pattern on a sheet of scrap paper.  Transfer the shape onto the shirt with a disappearing marker.  I have a 'mark be gone' marker because I do a  lot of sewing but if you don't have one you could use one of your kids washable markers.


Once you have transferred the shape remove your pattern and you're ready to head to the sewing machine.


I just used the zig zag stitch on my machine.  You could use a straight stitch or whatever you prefer.  I start at the point of the heart so you get a nice sharp point at the bottom.


Follow the line, stitch all the way around, and when you get to the end fold under a small portion of the trim to finish it off.  So easy!!  And look how cute they are!


The girls love them and now they have a fun shirt to wear to school on Valentines Day.  Such a great project for a beginning sewer or for some of you who need to dust off those sewing machines.  You know you need to!

Post some photos when you're done so I can see how well you did!  I'm looking forward to it!