Search This Blog

Wednesday, March 27, 2013

Snickerdoodles with Carrot Cake M&M's


Guess what!  I LOVE M&M's!!  Really I do.  My favorite are Peanut M&M's.  I just can't get enough of them.  So, when the holidays roll around I'm always looking to see what new flavors they have come up with.  Well, guess what I found the other day...Carrot Cake M&M's!!  Have you seen them?


They are white chocolate M&M's that taste like Carrot Cake.  They are super sweet so grab a glass of milk with them!  I thought they would be yummy in a cookie.  I decided to put them in a snickerdoodle cookie because I thought the cinnamon would be great with them.  I was right!  Super delicious!!


Just use your favorite snickerdoodle recipe and mix in the M&M's right before you bake them.  I used a recipe from one of my favorite bloggers.  You can find it here.  (She always has fabulous ideas so spend some time on her site!!)

These cookies turned out so soft and yummy!  So, go grab some Carrot Cake M&M's before they are gone.  I like to grab a few bags and put them in the freezer so I can enjoy them year round!  (Now you know my secret!)  ENJOY!!


Monday, March 25, 2013

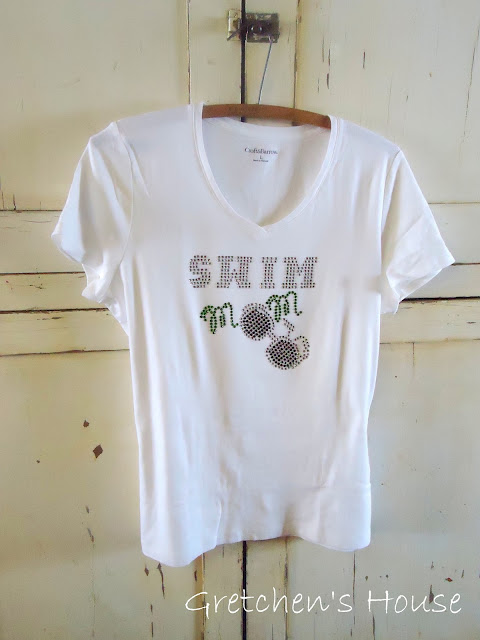
Rhinestone Team Shirt

Remember how I said I was addicted to rhinestones?  Well, here is the post I've been waiting to show you.  With the help of my mother and her fancy digital cutting machine I made this adorable swim team T-shirt!  Isn't it so cute?  I wore it to a swim meet not long ago and caught lots of ladies eyeing it!


I thought I would share how I made it.  Here's the list of supplies you will need:

  • T-shirt
  • Hotfix rhinestones (I used Sillhoette  brand)
  • Heat transfer tape 
  • Rhinestone template material
  • Backing board
  • Iron


I got all my supplies online.  There are lots of suppliers to choose from.  Just make sure your rhinestones are hotfix stones.  This means they have a heat activated glue on the back of them.

My mother has a Klick-n-Kut digital cutter but you can also use the Silouette to make your design. Silouette sells a rhinestone kit that has all the supplies you need to get started and create a couple projects.  Create your design and cut out your design on the template material.  It will look like this:


Notice only part of the design is there because the alligator will be a different color rhinestone so it is cut separately.  The template material is placed on the backing board.  Now is the fun part.  Dump your rhinestones on the template and smooth them around until each hole has a rhinestone in it.


Clear off any extra rhinestones.  Lay your heat transfer tape over the design pushing firmly so it will pick up all the rhinestones.  (Sorry about the design change.  I made two shirts and didn't take enough pictures!!  You'll get the idea though!)


 Lift the transfer tape, pulling up all the rhinestones.  If some don't come up just lay the transfer tape back down and press until they stick.  You can see some of mine didn't come up.


Repeat this process for each color rhinestone.  When you have all your rhinestones on your transfer tape place it on your t-shirt.


Follow the directions on the rhinestone package for ironing.  Mine said to place a cloth over the transfer tape, iron, cool, turn inside out and iron again.  After it cools pull the transfer tape off.


And there you have it, cute rhinestone shirts!


The best part is you can use the templates over and over again!


Go Gators!!


Friday, March 22, 2013

Bunny Tails for Easter

I saw some cheddar cheese balls the other day at the store and I thought, wouldn't those make really cute bunny tails for Easter.  I think the kids will think they are great!


I just learned the other day how to make labels and tags in Word.  I know, most of you already know how to do that!  I love learning new things and was able to use the new skill on this project.  Didn't they turn out so cute?

Here's what you need:


  • Jar or container
  • Lable
  • Adhesive
  • Ribbon
  • Cheese balls

I went to the craft store to find some cute containers but after seeing the prices I decided to just use some jars I already had.  Fill your container with the cheese balls, attach your label, and tie ribbon around the top.   That's it!  You're done!!  Have a fun day and stop by again!


Monday, March 18, 2013

Cowboy Britches


I love to find cute little ways to fancy up my kid's clothes. I always find lots of girly things but it's much harder to find things for the boys.  I found some great trim the other day and thought it was perfect for my little guy. Are these cute britches or what?!


I know, so cute!  I made a pair of these years ago as a baby shower gift and they were a hit.

Here's what you need:
  • A pair of britches - make sure they have grippers (snaps) in the inseam.  Otherwise you won't be able to get up into the legs to sew the trim on.


  • The trim - I found mine at Hobby Lobby but other sewing stores have it.


  • Denim needle for your sewing machine - you can try with a regular needle but plan on it breaking a bunch of times.  Ask me how I know!!


All you do is sew the trim up the side seams of the pants.  You can use overalls like I did or just on a regular pair of jeans.  I've also seen this trim in pink.  That would be adorable on a little denim skirt for girls!


I also sewed some of the trim along the top of the back pockets.  You could do it on the front center pocket also.  Go crazy!!


This little cowboy loves his new britches!!


He's calling grandma to tell her to read this blog!


Somewhat Simple
Thirty Handmade Days

Monday, March 11, 2013

Rainbow Cakes for St. Patrick's Day


So are you going to try the Leprechaun Hats recipe I posted?  I hope so.  You'll love it!  Here's what you can have for dessert with it....Rainbow Cakes!


Is that the cutest little cake or what?!  The kids thought they were fantastic.  Here's how you make them.  You will need:
  • Small jars, either baby food jars or jelly jars
  • White or yellow cake mix
  • Food coloring
  • Frosting
  • Rolos candy
All you do is mix up your cake mix, separate it into bowls and mix different food coloring into each bowl.


Layer the colors into your jars making sure to only fill them half way.  REALLY!  If you fill them more than half way you will end up with a huge mess!!  Bake them in the oven until a toothpick comes out clean.  Mine took about 15 minutes.


While they cool color your frosting green.  I used a piping bag and a grass tip to apply the frosting to the top of the cakes.  If you don't have those supplies just use a knife and frost the tops.  It will still look great!  Then, just put a little Rolo on the top!  Easy, right?


Saturday, March 9, 2013

Leprechaun Hats

(Ravioli with Spinach Pesto)

 As St. Patrick's Day is quickly approaching I thought I would share a really fun recipe that I use each year.  The kids think it's really fun and it's super easy to make.  We eat leprechaun hats!  Fun, right?!


Here's what you need:
  • 1 lb. package of frozen round ravioli
  • 7 Cups fresh baby spinach
  • 1 Cup fresh basil
  • 1/2 Cup bottled Caesar Parmesan vinaigrette salad dressing
  • 4 Tbs. water
  • Grated Parmesan cheese
Cook ravioli according to package directions.
For pesto, place remaining ingredients except the Parmesan cheese, in a blender.  Blend until smooth.
Toss ravioli with pesto and top with Parmesan cheese.

My kids love these and what a great way to get them to eat spinach!!  Happy St. Patrick's Day!


Thursday, March 7, 2013

Rhinestone Shirt


I'm sort of addicted to rhinestones these days.  I don't know why but a little sparkle makes me happy!  My mother has a fancy digital cutter so I called her one day to ask for her help with a rhinestone project.  While she was working away on that project (which you will see coming up in a future blog.  You won't want to miss it!)  I decided to go the old fashioned way...by hand!!

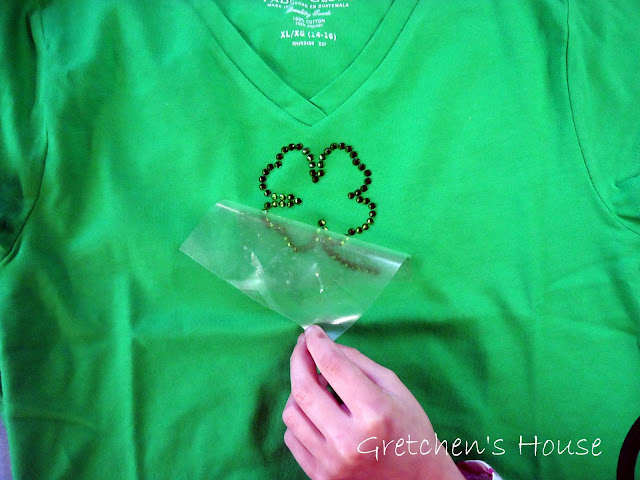
I made this cute shirt for my girl to wear on St. Patrick's Day.  We don't want anyone getting pinched ya know!


You only need a few supplies.  I ordered all of mine on the web and there are several sites to choose from.  You will need:

  • Heat transfer sheets
  • Hotfix rhinestones
  • Tweezers
  • Iron
  • Pattern


The pattern I used was just a clip art I got from my computer.  You could really use anything.  Something simple is best because you will be placing all the rhinestones one by one!

The first step is to place your heat transfer tape upside down over your pattern.  That would be the sticky side up!  I used a little piece of tape just to hold it in place.


Now's the fun part.  Begin placing your rhinestones along the pattern upside down.  That's right, glue side up.  I used the tweezers from my serger and they worked great.


After placing two or three stones I would push down on the stones with my finger to make sure it stuck well.  When all the stones are placed flip your heat transfer tape over and place it on the backing it come on.

It should look something like this:


You are now ready to iron.  Heat your iron following the instructions on the rhinestone package.  Peel the backing off the transfer tape and place your transfer tape on your shirt.  


Place a cloth between your iron and the transfer tape. Iron according to the package instructions.


Let it cool completely then peel off the heat transfer tape. 


Turn the shirt inside out and iron again to make sure you have activated all of the glue on the back of the rhinestones.

And you're done!!  Now how easy was that?  There are so many possibilities with this and you don't have to have a fancy machine to do it!!


Monday, March 4, 2013

Adventures in Moving Part 2

The Day Our Stuff Came

After the cross country adventure we were so glad to be home.  However, the adventure was not over!  As it was Christmas Eve, we were expected in Salt Lake for Todd's mom's celebration.  Everyone was so excited to see the family and celebrate the holiday.  We began getting everyone showered and into clean clothes.  We were all still in the clothes we had worn the day before and slept in!  Yuck!  Of course, it began to snow and snow hard.  We really wanted to go and see the family but the roads were getting worse and worse and we really didn't want to risk driving over the mountain.  We made the decision to stay put for the night.  Shoot!

We put up the Christmas tree and enjoyed our traditional sloppy joe by candle light meal.  This tradition was started by Gretchen's family while she was growing up.  Crazy tradition but really fun!  We actually found some candles in the basement that we had used for the family reunion earlier in the summer!


After the good meal the kids opened their new jammies.


Then off to bed for the night.  The girls had beds in their room that were left over in the house.  Ethan had to sleep on the floor in his room.  It was really cold but the kids snuggled under as many blankets as we could find.  

Santa found us that night and we had a fun morning.  We were able to make it down to Salt Lake on Christmas day and see some of the family.

The moving truck with our stuff came a few days later.  We were so glad to see our stuff but what a crazy day of unloading!!  I really had NO IDEA how crazy it would be!


Todd was really glad to see his truck.  I know, funny that a truck carried his truck across the country!


Can you see Todd's truck on the truck?

Our home in Nebraska was a 5 bedroom with tons of closets and storage.  Our new house in Utah is only a 3 bedroom with NO STORAGE!  The bedrooms have no closets.  Really, no kidding!  The movers stacked  boxes from floor to ceiling, filled the carport, and quickly ran out of places to put things!


Here's the baby's room.  Um, I don't think that looks like a very safe place to sleep!!  Don't worry, we moved some things before we put him to bed!

The kids were real troopers through it all.  When it was time for lunch we had nowhere to sit so the youngest daughter wiggled her way into the high chair.


The baby decided it was more fun to sit in the high chair backwards!


Notice he's still in his jammies at lunch time!

Nap time was right around the corner and he actually slept through it all!  Can you find the baby in this picture?


Even the dog was having a stressful day and decided to take a snooze!  Doesn't he look comfy!?


What an adventure!  In the end, we made it!  What's an adventure without a few bumps along the way, right?!