So here is my latest project...a new old chair. I found this old nasty chair a couple years ago at a thrift store in Omaha. I loved the shape and style of it but it obviously needed re-upholstered. It was only $10 so I figured some day I would scrape up the money and have it re-done. I could tell by the way it was made that it was worth doing so I convinced my skeptical husband that we should buy it. You should have seen the look on his face! He must LOVE me because he went along with it and bought the chair.

It sat around our house in Nebraska for a while moving from spot to spot and never really finding a home or new fabric. When we moved back to Utah it found it's home in our big bay window next to my antique treadle sewing machine. It continued to deteriorate while the kids climbed on it and the dog adopted it as his chair to sit and bark at people out the window.

After finally remodeling the living room I decided my chair had to be done. Now by this time, I had enough time to convince myself that I could do the re-upholstering myself. Crazy, I know!! I often found myself thinking about how it was put together and thinking that if I got in the middle of the project and was in over my head, which was highly likely, I could always give up and haul the pieces to a real professional and have them put it back together. Good plan, I thought.
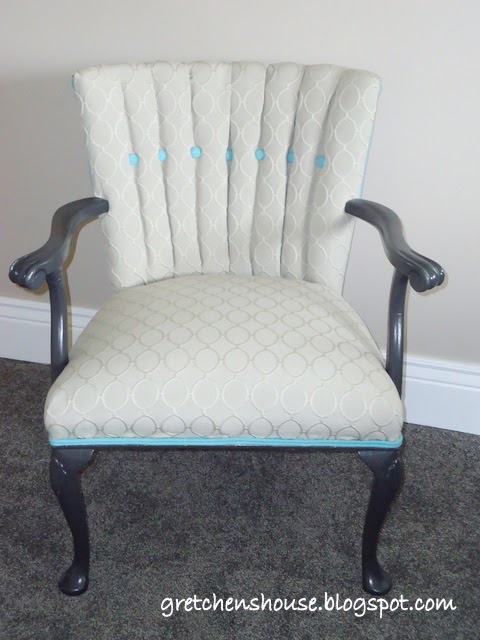
So, I headed to the fabric store for supplies. I had done some simple re-upholstering projects in the past so I sort of knew a few things. I knew I wanted gray fabric with the teal accent to match the rest of the room. I found some beautiful gray fabric with this really cute circle pattern to give it some texture. Just perfect! All of the supplies cost about $125 so now I know why the professionals charge so much!
 |
| Little bit had to try it out while he was eating his fruit snacks! |
I started by taking the old fabric off and taking tons of pictures. I saved all the fabric pieces and labeled them so I could use them as the pattern for the new fabric. I was shocked to find that this chair had been re-upholstered before. Another testament to the fact that the chair was well made, stylish, and worth saving! There were still pieces of the original fabric on the front fanned part of the chair that had also been dyed green.

I went to work using the old pieces of fabric as patterns for the new fabric. I tightened the strapping on the bottom of the chair to hold the old springs in place. I enlisted my hubby to help because that was a two man job. I also painted the arms and legs black to match the new living room decor.

I made piping out of the teal fabric and covered the buttons in teal too. That's the accent color I used in the new living room. I've made tons of piping over the years to use on bridal gowns and historic costumes so that was a piece of cake. If you have never made piping you could just purchase pre-made piping.
I was able to get it all put back together and I LOVE IT!! It just looks so adorable in the front window. It wasn't as hard as I thought it was going to be. I'm glad I took lots of pictures to reference as I put it back together. I always think I will remember how the corners were done, or how it fits back together but I don't.

Anyway, my advice is don't be afraid to try new things! Jump right in and if you get stuck there is always someone to help out. In the end, if things had gone horribly wrong with my chair I wasn't out much!

Oh my goodness! That chair looks amazing! What is so easy about piping? Doesn't it take tons of fabric because you have to cut it on the bias?....and piece it together too? Can I hire you to make piping for my kitchen dinette cushions?
ReplyDeleteYou do cut piping on the bias but you can get 4 or 5 yards of piping out of a yard of fabric. I'd be happy to make you some piping. Bring me the fabric. I'd even show you how easy it is to make!
DeleteWow! Beautiful! Did you carve out a new arm ? Or did it come with it?
ReplyDeleteMarcia, the arm came with it. I had to glue it back together. Carving a new arm is WAY out of my league!
Delete